--please scroll down for the introduction--
How did you make out with your exercise on painting with the palette knife? Were you able to apply the paint like frosting a cake? Sometimes a person who has used nothing but a brush in their paintings, have difficulty in switching the brain to accept the concept of painting differently. So, you’ll have to make a conscious effort to make sure you are applying paint with a knife and not with a brush.
Were you able to see the video from Michael Pintar? It was fascinating to watch how he went from “nothing” to the Italian street scene. And how he deliberately placed colors in seemingly random places, only to wind up as being perfectly placed to achieve his desired goal. Wow! whadda show!
With that said, today we’re going to embark on doing some meaningful strokes. You may click on the image below of the Geese. This was the second painting I did with my new found friend, the palette knife. If you are able, you can copy it and print in out as large as you can. I want you to copy what I did. Your version won’t be stroke for stroke, because it will be yours.
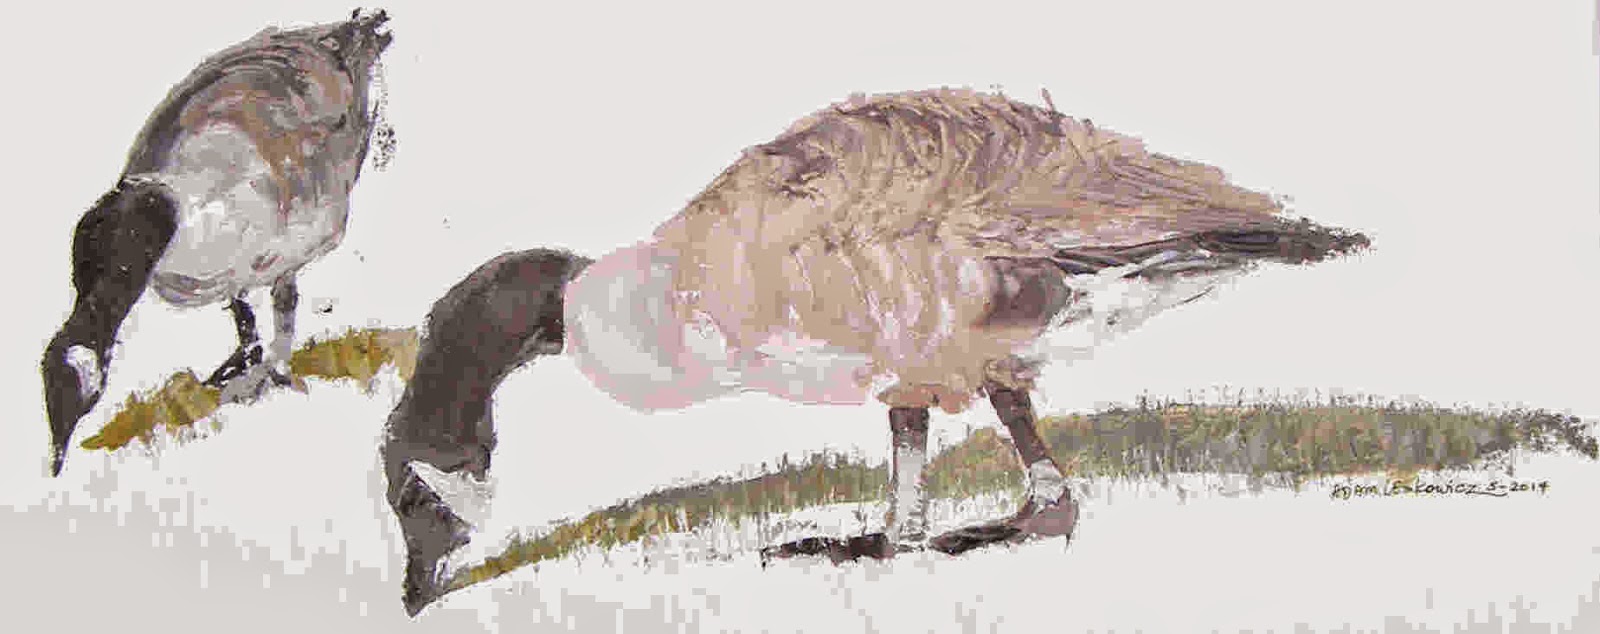 What I want to draw your attention to are the three parts of the goose-- the head, the body, and the feet. The rest is superficial.
I mixed a small portion of Burnt Umber to a blob of white, adding a small pinch of Cadmium Red Light to “soften” the color, and probably a little Yellow Ochre. You can experiment yourself with proportions.
Then, when I did this one, I created the shape of the body first, usint my favorite knife, the black-handled one. I loaded up the blade, started at the base of the neck and drew the flat of my knife toward the back of the bird, made the hump, and drew down to where that color ended. I then carefully noted the shape of the underside of the bird and followed that contour.
People ask if they should first pencil the outline in first. You can if you want, but I wouldn’t recommend it. We kinda get “married” the the outlines and miss out on seeing the overall shape.
Of course, placement on the canvas plays a role in the overall finished product. So be aware of where you’re putting your first stroke.
One of the benefits of drawing with a palette knife is the ability to see the larger picture. Let me explain.
An idea comes to us in our brain. We visualize it and begin to see all the intricasies associated with it.
We’re holding a brush, or in our case, a palette knife in our hand, ready to translate that image to our canvas.
On the way to our hand, the image first passes from our brain, to our shoulder, through our arm, and to the hand.
When we get the idea that we are painting from our shoulder, we then are able to see the image come alive on our canvas from arm’s length, thereby seeing the larger picture. The wrist and slight movements of the hand play a lesser role here.
Okay, how are we doing?
Push off as much paint from your knife as you can, then wipe it clean with a paper towel.
The neck is not exactly black. Take another look at it. A closer look. (Yes, I use black much to the dismay of some of my friends. They create their black using Prussian Blue and Burnt Umber).
I mixed a tiny smidgen of white to some black for the base coat. A closer look will reveal several colors in the neck.
Then, following the contour of the neck, I started from the body and pushed my knife along that severe curve in his neck, watched carefully when and where to create the top of his head, and ended near the ground. I then located a beginning point for the underside of the neck, again pushing the knife around that tight curve and came to a point somewhat resembling his beak. The white flare on his cheek was done later.
For the feet I used the same knife because, like I said, it’s more veratile and more able to control what I’m doing. Using the flat edge of the blade I placed strokes of black in strategic places to form the legs, then the side of the blade, drawing it downward to form the webbed feet.
The tail was formed using the same black as neck and feet. There’s also some textured black on the bird’s back, made with my favorite knife.
Be careful not to disregard or flatten out your strokes. The texture that you leave with each stroke adds to the beauty of palette knife painting. I wish you could see the original and “feel the feathers”, so to speak.
You’ll notice there’s some white on the underbelly and rear of the bird. These are all added later to enhance the reality of the subject.
See you tomorrow for something a little more challenging.
--Adam


